Complex Shapes Assembled and Disassembled
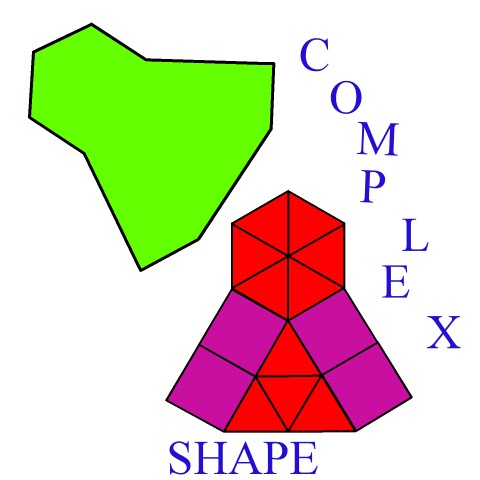
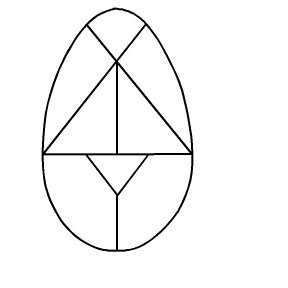
As you can see from the image to the left, Complex Shapes can indeed, at first glance look incredibly complicated. Most students, if given just the green image, would cringe at the very thought of having to calculate either the perimeter or area of this shape. However if you offer them the red and purple image, the majority would know exactly what to do with it!
And this is the skill we want to teach them.
To have success with complex shapes, the trick is to offer many activities where the student will learn that by simply putting certain types of shapes together, or by 'reducing' a complicated shape to simpler ones, they can create shapes they are comfortable working with. For example, two rhombus' will create a parallelogram; two squares - a rectangle etc. Bellow you will find a number of different sheets of shape outlines, starting with simple squares and rectangles and building up to more complicated combinations.
This activity is fun for all grade levels, and can easily be altered to suite any ability level.
This section is all about giving you, the parent or tutor, the tools to explain fully to your student, what is going on. By having a little fun with this, your student, will in no time start to 'see' all these smaller shapes within the larger one. Then, perimeter and area questions will no longer be difficult.
Sheet 1: Triangle, Square, Rectangle
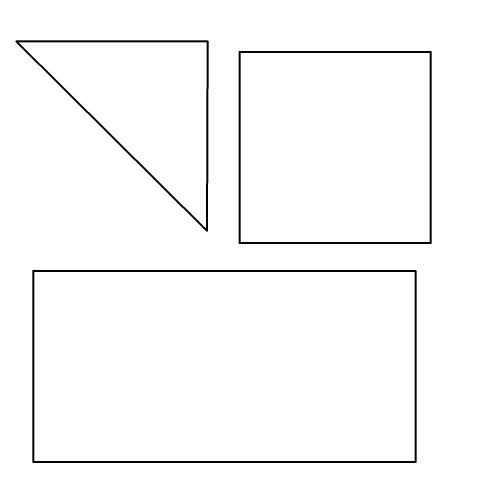
This first sheet has only the triangle, square and rectangle on it. These three shapes make up the bulk of complex shapes any elementary student will have questions about.
So what do you do with these?
First, print off on card stock, or on paper, but glue to card. Cut out all the shapes - accurately. Print off two or three sheets to get a number of shapes.
Then play a game. These shapes are sized so the side of the triangle, square and short side of the rectangle are all equal in size. The length of the rectangle is twice its height (or twice the length of the square). They fit together perfectly, with no gaps. The more accurate you are at cutting these out, the more fun you will have.
First allow your student to quiz you! Tell them to put a few different shape together (with no gaps) and then draw, just the outline of the shape.
You then have to guess which shapes they used, to make their shape.
Your child will have to do this quite a number of times to become proficient at it. And remember! There is nothing obvious,or simple, or easy unless you know how to do it.
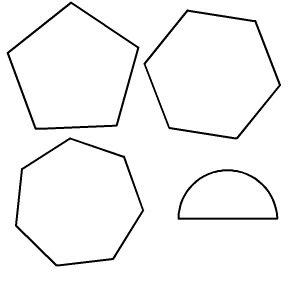
Sheet 2: Pentagon, Hexagon, Heptagon, Semicircle
When shape recognition is coming easily, it is time to take the next step. You can either move on to the next set of shapes, which includes some of the regular polygons, and the semi-circle. Or, you can stick with the shapes you are currently using, and add some calculations to the mix. If you chose the calculations path, initially start with simpler calculations, such as giving the perimeter and asking to find the length on just one side.
Then you can move on to more complicated ones, such as having two missing sides, but on a rectangle. Here not only do they have to be comfortable with the calculations, but the also have to 'see' that the two missing sides are the same as it is a rectangle, etc.
All these polygons have sides that measure the same length as the square from our first sheet of 2D shapes.
I am sure you will find all the information and worksheets you need here, however if there is anything you cannot find please don't hesitate to contact me or simply visit the MathMomentumCommunity and join the conversation!
I love to hear from my readers, and with a little feedback and a few suggestions I can make this a great resource for parents, teachers and tutors alike.
Be sure to explore everything on this site starting at the home page.
Return from complex shapes to our 2D Geometry shapes section or head to our K6-geometric-shapes home page to explore all the other great sections of elementary geometry I have to offer, all of which, when put together, will help your child master complex shapes.
